

How to install osTicket
on Ubuntu 14.04.4.
Now take this all with a
grain of salt. I have never used
osTicket or installed it. Recently
someone asked me for help on how to get it to post to a slack room. After looking at it I thought that looks
interesting enough to install and poke at.
I found this guide
showing how to install osTicket http://idroot.net/tutorials/how-to-install-osticket-on-ubuntu-14-04/ [1]
I prefer using nginx over apache and postgres over
mysql. Poking around it looks like
osTicket does not support postgres http://osticket.com/forum/discussion/3429/postgresql-instalation
[2]. In that case I won't go out of the
box on this first installation and stick with Apache and MySQL.
Install Apache/PHP
|
> sudo apt-get update
> sudo apt-get
upgrade
> sudo apt-get
install -y apache2-mpm-worker libapache2-mod-fastcgi php5-fpm php5 php5-mysql
php5-imap php5-gd unzip
> sudo php5enmod imap
> sudo service
apache2 restart
|
Enable php5-fpm.conf
|
> sudo vi
/etc/apache2/conf-available/php5-fpm.conf
|
And place the following in it
|
<IfModule mod_fastcgi.c>
AddHandler php5-fcgi .php
Action php5-fcgi /php5-fcgi
Alias /php5-fcgi /usr/lib/cgi-bin/php5-fcgi
FastCgiExternalServer /usr/lib/cgi-bin/php5-fcgi -socket
/var/run/php5-fpm.sock -pass-header Authorization
<Directory /usr/lib/cgi-bin>
Require all granted
</Directory>
</IfModule>
|

Enable the modules
|
> sudo a2enmod actions fastcgi alias
> sudo a2enconf
php5-fpm
> sudo service
apache2 restart
|
Test it

Apache is running, but what
about php?
Create a test php file.
|
> sudo vi
/var/www/html/phpinfo.php
|
Place the following in it
|
<?php
phpinfo();
?>
|
Save it then run this to change
ownership to www-data
|
> sudo chown -R
www-data:www-data /var/www/html/
|

It's working!
Now what about cgi.fix_pathinfo
stuff?

It's there! I think this is the right set up.
Note:
for a real build remember to remove the phpinfo.ini file don't want this
valuable info falling into the wrong hands.
Install MySQL
|
> sudo apt-get
-y install mysql-server mysql-client
|

Set a new root user
password for mysql
Improve MySQL security
by running this command https://dev.mysql.com/doc/refman/5.7/en/mysql-secure-installation.html [3].
|
> mysql_secure_installation
|

I already set a password
for root…

Yes remove Anon Users.

Disallow root login
remotely.

Remove test database.

Reload privileges
now. Yes!

Done!
Login to MySQL and create Database
|
> mysql -u
root -p
|
And run this sql query. (of course you would want to change the
password)
|
> create
database osticketdb;
CREATE USER 'osticketuser'@'localhost' IDENTIFIED BY 'ospassword';
GRANT ALL ON osticketdb.* TO 'osticketuser'@'localhost';
flush privileges;
exit;
|

Install OsTicket

Click on Downloads.

Click on Download in osTicket
(the free opensource version)

Click on Download

Click No Thanks

It will start downloading,
pause it. I don't want to download it on
my main machine I just want the URL.

Right click on click here and
select Copy Link Address. In my case I
got http://osticket.com/sites/default/files/download/osTicket-v1.9.12.zip
|
> wget http://osticket.com/sites/default/files/download/osTicket-v1.9.12.zip
|
Download it.

|
> unzip
osTicket-v1.9.12.zip
> sudo mkdir
/var/www/html/osticket
> sudo mv upload/*
/var/www/html/osticket/
|
Unzip it and move the folder
over
Change the ownership to
www-data
|
> sudo chown
-R www-data:www-data /var/www/html/osticket
|

Restart the server
|
> sudo reboot
now
|
Now open it up in a web
browser. My local IP on the box happens
to be 192.168.0.25 so I will open http://192.168.0.25/osticket/ (of course for you replace the 192.168.0.25
with your address or URL.

Good it's working and it looks
like all my checks are passing.

Click Continue

OK, some simple instructions.
|
> cd
/var/www/html/osticket
> sudo cp
include/ost-sampleconfig.php include/ost-config.php
> sudo chmod
644 include/ost-config.php
> sudo chown -R
www-data:www-data /var/www/html/osticket
|

Click Continue

Hey something to fill out!
Filling it out
Let me go slow and fill this page out one bit at a time.

I will give it a name and set a
default email. I have a feeling I may
need to tweak some email settings somewhere so I can get it to use my gmail
account to send out emails.

Create an admin user with their
email and a password to login.

Hmmm database….
I ran this earlier to create a
DB in mysql for osTicket
|
> create
database osticketdb;
CREATE USER 'osticketuser'@'localhost' IDENTIFIED BY 'ospassword';
GRANT ALL ON osticketdb.* TO 'osticketuser'@'localhost';
flush privileges;
exit;
|
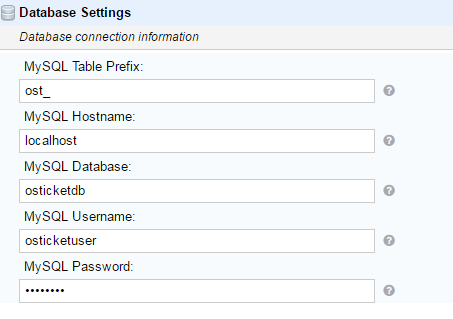
I think this makes sense. My database is named osticketdb. My MySQL username is ostickeruser. And my password is ospassword.

Click Install Now.

Looks like that did it.
Now remove the setup folder
|
> sudo rm -r /var/www/html/osticket/setup
|
Fixing sendmail
It looks like out of the box it
is trying to use sendmail. I need to
install it and configure it to use my gmail account. I found this page that shows how to do this https://linuxconfig.org/configuring-gmail-as-sendmail-email-relay [4]
You also may have to enable POP/IMAP in our gmail
account. TO do that, do the
following. Login to your gmail account.

Click on the tools and click on Setttings

Enable Pop and IMAP.
Now back to sendmail install…
|
> sudo apt-get
install sendmail mailutils sendmail-bin
|
Install
|
> sudo su root
> mkdir -m 700
/etc/mail/authinfo/
> cd /etc/mail/authinfo/
|
Make Gmail auth file folder
|
> vi gmail-auth
|
Create the file
And place the following in it.
|
AuthInfo:
"U:root" "I:YOUR
GMAIL EMAIL" "P:YOUR PASSWORD"
|
Of course put in your email and
password for gmail
|
> makemap hash gmail-auth
< gmail-auth
|
Make a hash map of auth file.
Edit /etc/mail/sendmail.mc
|
> vi
/etc/mail/sendmail.mc
|
Place the following above the MAILER_DEFINITION LINE
|
define(`SMART_HOST',`[smtp.gmail.com]')dnl
define(`RELAY_MAILER_ARGS', `TCP $h 587')dnl
define(`ESMTP_MAILER_ARGS', `TCP $h 587')dnl
define(`confAUTH_OPTIONS', `A p')dnl
TRUST_AUTH_MECH(`EXTERNAL
DIGEST-MD5 CRAM-MD5 LOGIN PLAIN')dnl
define(`confAUTH_MECHANISMS', `EXTERNAL GSSAPI DIGEST-MD5
CRAM-MD5 LOGIN PLAIN')dnl
FEATURE(`authinfo',`hash -o
/etc/mail/authinfo/gmail-auth.db')dnl
|

Rebuild sendmail's
configuration.
|
> make -C
/etc/mail
|
Reload sendmail
|
> service
sendmail reload
|

Test it out
|
> echo
"Just testing my sendmail gmail relay" | mail -s "Sendmail gmail
Relay" my-email@my-domain.com
|
Put in your email

It worked! (but very slowly)
I found this post https://www.digitalocean.com/community/questions/sendmail-is-slow-to-send-mail [5] which mentions that if you see sleeping for retry
in /var/log/mail.log you may have a problem with /etc/hosts
|
> grep -n
"sleeping for retry" /var/log/mail.log
|

Yep looks like I have that
issue. Edit /etc/hosts
|
> sudo vi
/etc/hosts
|
I updated mine to
|
127.0.0.1
localhost
127.0.1.1
ubuntu
# The following lines are
desirable for IPv6 capable hosts
::1 localhost
ip6-localhost ip6-loopback
ff02::1 ip6-allnodes
ff02::2 ip6-allrouters
127.0.0.1
localhost.localdomain localhost basic-servername
|
Now test it again
|
> echo
"Just testing my sendmail gmail relay" | mail -s "Sendmail
gmail Relay" my-email@my-domain.com
|
Put in your email
Wow now it is fast!
Test


Click on Admin Panel.

Click on dashboard and
Information. In the PHP settings you
should see the cgi.fix_pathinfo looks like this.
Now to test the email…

Click on Emails then
Diagnotic. Now fill out the email and
click Send Message.

Success it worked
Kick the tires
Please note I have never ever
used this product so give me some grace as I kick the tires J.

Looks like I am a guest user,
not logged in. Can I Open a Ticket?

Fill it out and create Ticket

Wahoo it worked!

It sent me an email.
I think that does it!
I have a good basic install of
osTicket and now I can work on figuring out how to get it to post to a slack
room.
References
[1] How To Install osTicket on
Ubuntu 14.04
[2] PostgreSQL instalation
[3] mysql_secure_installation —
Improve MySQL Installation Security
[4] Configuring Gmail as a
Sendmail email relay
[5] Sendmail is slow to send
mail
thx for this howto. do not forget to mention how set the rights with chmod to all php files.
ReplyDeletemy one were --------- instead of rw-r--r--
Good point! Having no permissions would make life difficult :)
DeleteHi Patrick
Deletemay be you are interested to write the how to install osticket on ubuntu server 16.04.1.
i succeded to get the installer to start - v1.10-rc3 i know, not a version for production but soon comes the right one :-) -
The most important thing is to replace all php5 with php that will be php7 i guess, i am not a geek only a simple linux sysadmin. anyway the required is respected, but some reccomanded services like php xml, xml-dom, mbstring extension, intl extension and apcu extension is missed. i will google for install this. all the best mauri
install osticket1.10-rc3 on ubuntu server 16.04.1, a lazy and quick and dirty howto
Deletetasksel # choose LAMP-server
# the rest is based more or less from the how to of Patrick
apt-get install php-fpm php7.0-fpm
a2enmod actions fastcgi alias # seems not to be necessary as already activated
a2enconf php7.0-fpm
systemctl restart apache2
systemctl restart php7.0-fpm
mysql_secure_installation # now follow the advices of Patrick (do not know if necessary to do)
mysql -u root -p
#execute this sql code (change osticketuser and ospassword as you wish) :
create database osticketdb;
CREATE USER 'osticketuser'@'localhost' IDENTIFIED BY 'ospassword';
GRANT ALL ON osticketdb.* TO 'osticketuser'@'localhost';
flush privileges;
exit;
#download osticket and be shure to have the last version
wget https://github.com/osTicket/osTicket/releases/download/v1.10-rc.3/osTicket-v1.10-rc.3.zip
#unzip osticket
unzip osTicket-v1.10-rc.3.zip
mkdir /var/www/html/osticket
cp upload/* /var/www/html/osticket/ -arp
cd /var/www/html/osticket/
chmod -R 755 * # strangely chmod -R 755 "*php" does not work :-)
chmod 755 web.config
apt-get install php-apcu php7.0-intl php7.0-mbstring php7.0-xml php7.0-gd php7.0-imap
systemctl restart apache2
chown -R www-data:www-data /var/www/html/osticket
reboot
#login with IP/osticker in a browser and follow the instructions
Thanks very useful information.
DeleteI have not yet switched over to 16.04. I think I will before Christmas.
This will be very helpful when I do :)
Thank you for that, the instructions given by Patrick mostly worked, but I received Access Denied.
DeleteI used :
chmod -R 755 * # strangely chmod -R 755 "*php" does not work :-)
chmod 755 web.config
and now it works great.
Thank you Mauritzio and Patrick, :)
This comment has been removed by the author.
ReplyDeleteThank you for this tutorial its works , but i did not configure the email.
ReplyDeleteHow about if i use my own domain it will same procedure?
thnank you
It should be pretty close. You will need to figure out how to properly set up the sendmail to connect to whatever email service you are using (not really my expertise but I am sure a google search or two should uncover a how to)
DeletePlease Help me
ReplyDelete447:Jun 15 06:11:47 nocskytel sm-mta[15791]: My unqualified host name (nocskytel) unknown; sleeping for retry
448:Jun 15 06:11:49 nocskytel sm-msp-queue[15796]: My unqualified host name (nocskytel) unknown; sleeping for
447:Jun 15 06:11:47 nocskytel sm-mta[15791]: My unqualified host name (nocskytel) unknown; sleeping for retry
448:Jun 15 06:11:49 nocskytel sm-msp-queue[15796]: My unqualified host name (nocskytel) unknown; sleeping for retry
469:Jun 15 06:15:04 nocskytel sendmail[15819]: My unqualified host name (nocskytel) unknown; sleeping for retry
479:Jun 15 06:17:38 nocskytel sm-mta[15887]: My unqualified host name (nocskytel) unknown; sleeping for retry
480:Jun 15 06:17:40 nocskytel sm-msp-queue[15892]: My unqualified host name (nocskytel) unknown; sleeping for retry
484:Jun 15 06:18:48 nocskytel sendmail[15903]: My unqualified host name (nocskytel) unknown; sleeping for retry
494:Jun 15 06:20:01 nocskytel sm-msp-queue[15928]: My unqualified host name (nocskytel) unknown; sleeping for retry
589:Jun 15 06:26:02 nocskytel sendmail[16112]: My unqualified host name (nocskytel) unknown; sleeping f