
I am writing this to better understand how ec2 internal and
external IP addresses change and work within VPC, also to learn how to use VPC.
VPC (Virtual Private Cloud)
Be warned, this is my first time playing around with
VPC. I will do my best, but I am bound
to miss some concept.
Creating a VPC network
For my virtual private cloud I am going to keep things
simple.

Something like this figure shown above. I want a VPC were every system has access to
the internet, so I can use things like apt-get within Ubuntu. I only want a few of the systems to be
accessible from the internet via SSH or port 80. I also want to run an RDS database within
the VPC.
Sign in the AWS console.

Click on VPC

Click on “Get started creating a VPC”

Select “VPC with a single Public Subnet only” and click continue

Click on Edit Public Subnet and select us-east-1a as the
Availability zone.

Click Create VPC

Success! Click close.
Starting an EC2 instance in the VPC
Before I create an EC2 instance in the VPC it’s important to
note this.
AWS reserves the first four IP
addresses and the last IP address in each subnet's CIDR block. They're not
available for use.
Create a security group
VPC has its own security groups separate from the EC2
security groups. VPC security groups
have inbound and outbound rules, where ec2 only has inbound.

Click on Security groups then on Create Security Group.

Call the group vpcwebserver select the VPC that was just created and click yes, Create
For this I am simply going to open up port 22 and 80 for
Inbound traffic.

Select the security group then select the inbound tab. Finally select HTTP and click on Add Rule.

select SSH and click on Add Rule.

Now click Apply Rule Change.

This will allow any inbound traffic on ports 80 and 22
To create an instance within this subnet we need the subnet
ID.

Click on Subnets then you can copy the subnets id from here.
In my case its “subnet-e6190d8d”
Also when using
the command line tool you cannot use the group alias name when starting an ec2
within a VPC you must use the id.

Click on Security Groups and copy the Group ID in the details section. In this case it is sg-0dc12962.
For more information on the specific options to the
ec2-run-instances command line tool check out
Here is my command line,
this AMI is an ubuntu 12.04 LTS EBS AMI.
> ec2-run-instances ami-9c78c0f5 -b
/dev/sda1=:8:true -k pats-keypair
-t t1.micro -s subnet-e6190d8d
-g sg-0dc12962 --private-ip-address 10.0.0.20 --secondary-private-ip-address 10.0.0.125 --availability-zone
us-east-1a
|

The internal IP addresses were added correctly.

Looking at the EC2 web console we can see the created EC2 and that it has the two internal IPs listed correctly
One thing you will not see here is a public IP address or a
public DNS record.
So now I need to figure out how to get to this machine?
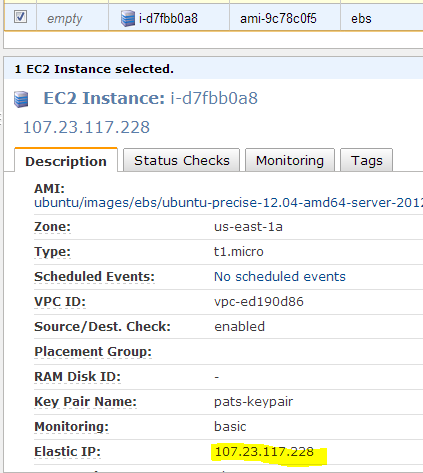
Assign an Elastic IP address
The EIPs within VPC are different than the ones within the
EC2 space


Select VPC and click on Yes, Allocate

Select the IP address and click on Associate Address

Select the Instance id and click Yes, Associate.
Going back to the EC2 console you can see that this EIP is
now associated with this instance.
SSH into this box.
> ssh
-i .ec2/pats-keypair.pem ubuntu@107.23.117.228
|
Login worked just fine.

Run the following command
> ifconfig
-a
|

Only the primary internal IP address is shown.
To get the secondary IP working you need to edit the
/etc/network/interfaces file
> sudo
vi /etc/network/interfaces
|
Append this to the end of the file
# The secondary
netwrk interface
auto eth0:0
iface eth0:0 inet static
address 10.0.0.125
netmask 255.255.255.0
|
Run this to update the changes
> sudo
ifup eth0:0
|
Run the following command again
> ifconfig
-a
|

This should get the secondary IP address working.
To confirm its working I am going to
bring up a second machine in the same subnet but without an EIP.
This will have two internal IP address as well 10.0.0.21 and
10.0.0.126
> ec2-run-instances ami-9c78c0f5 -b
/dev/sda1=:8:true -k pats-keypair
-t t1.micro -s subnet-e6190d8d
-g sg-0dc12962 --private-ip-address 10.0.0.21 --secondary-private-ip-address 10.0.0.126 --availability-zone
us-east-1a
|

Now I need to fix the VPC security group so that these two machines can talk to each other. Machines with the same security group can’t necessarily talk to one another unless you set it up to do so.
From the VPC console.

Select Security groups. Then select the vpcwebserver group and copy the Group ID in this case "sg-0dc12962"

Select “All Traffic” then enter the security group id and click “Add Rule”

Then click “Apply Rule Changes”
Connect to the second machine
From the first machine, which has an elastic IP address and
the internal addresses 10.0.0.20 and 10.0.0.125, ping the second machine.
> ping 10.0.0.21
|

Success!!
I can’t ssh into this second box without the keypair. So I will scp it to the home directory from
my machine.
> scp
-i .ec2/pats-keypair.pem .ec2/pats-keypair.pem ubuntu@107.23.117.228:
|
Now from the first machine.
> ssh
-i ~/pats-keypair.pem ubuntu@10.0.0.21
|

And that gets me in.
Ping the first machine
> ping 10.0.0.20
|

Ping the first machine’s second internal IP address
> ping 10.0.0.125
|

Success!
Attach the second internal IP address (2nd machine)
Run the following command
> ifconfig
-a
|

Only the primary internal IP address is shown.
To get the secondary IP working you need to edit the
/etc/network/interfaces file
> sudo
vi /etc/network/interfaces
|
Append this to the end of the file
# The secondary
netwrk interface
auto eth0:0
iface eth0:0 inet static
address 10.0.0.126
netmask 255.255.255.0
|
Run this to update the changes
> sudo
ifup eth0:0
|
Run the following command again
> ifconfig
-a
|

This should get the secondary IP address working.
Go back to the first machine and run the
following commands
> ping 10.0.0.126
|

Success!!
SCP the keypair to the second machine.
> scp
-i ~/pats-keypair.pem pats-keypair.pem ubuntu@10.0.0.21:
|
Now ssh into the second machine via the second internal IP
address
> ssh
-i ~/pats-keypair.pem ubuntu@10.0.0.126
|
This worked
Now from the second machine try to ssh back into the first
machine
> ssh
-i ~/pats-keypair.pem ubuntu@10.0.0.20
|
Success!
Now try the second internal IP address
> ssh
-i ~/pats-keypair.pem ubuntu@10.0.0.125
|
Success!
References
[1] Get Started with
Amazon VPC
Visited 11/2012
[2] ec2-run-instances
documentation
Visited 11/2012
[3] How to connect to
outside world from amazon vpc?
Visited 11/2012
No comments:
Post a Comment