

In this article I am
just going to get GlustreFX installed and up and running.
Formatting the local drive (XFS)
For my set up I have created 3 virtual machines running
Ubuntu 22.04 with a 200GB drive. Then I
added an unformatted second drive to each of the 3 servers. For the first 2 I created a 13.5 TB and for
the third I created a 2TB drive to show how it can work with different sized
drives.
GlusterFS will work with EXT 4 but XFS is preferred so I
will stick with their recommendation. In
fact GlusterFS will work with any filesystem that has extended attributes.
Also I will be using the GlusterFS quick start guide https://docs.gluster.org/en/latest/Quick-Start-Guide/Quickstart/
[2].
Let see what we have.
|
> lsblk |

So there is my drive that needs to be formatted “sdb”
First Create a partition
|
> sudo fdisk /dev/sdb |

This drive is over 2TB so can’t use fdisk simply
See http://www.whiteboardcoder.com/2019/02/formatting-disks-over-2-tib-with-parted.html [3] For more details.
Some better notes I have
found https://unix.stackexchange.com/questions/29078/how-to-partition-22tb-disk [4].
Use Parted, as root.
|
> sudo su - > parted -a optimal
-- /dev/sdb mkpart primary xfs 1 -1 |

Then format it in XFS
|
> mkfs.xfs -i
size=512 /dev/sdb1 |

Make take a moment for this command to run
See if its set up
|
> parted -l |

Now I need to edit /etc/fstab to set it up to auto mount
|
> vi /etc/fstab |
And add the following line to it
|
/dev/sdb1 /data/ xfs defaults 1 2 |

Now create a folder to mount
this drive to
|
> mkdir -p /data |
Run this to mount (as root)
|
> mount -a |
Now check
|
> df -h |

There it is 😊
Now reboot it to make sure it auto-mounts
|
> reboot |

OK look good
Hmm looking at actual file size looks like the -h (human readable) is rounding
up to 14TB of the actual 13.5 TB.
Now I am going to repeat this process for my other two
servers.


Of course the 3rd server gluster_fs has a smaller
drive 2TB vs 13.5 TB. I did this on purpose to show how you can cluster servers
with different size drives.
Install GlusterFS server via apt
First let’s check which version of GlusterFS is available via apt-get out of the box.
Run the following to cmd to see.
|
> apt show
glusterfs-server |

We see version 10.1-1
Looking at https://www.gluster.org/release-schedule/ [5]

Looks like we are pretty good.
Looks like a version 11 was just introduced a few days ago so no need to jump
to that yet. Also it looks like version
10 is on 10.3 not 10.1. So there are a
few updates there…
We can see what issues were fixed in 10.2 and 10.3 at
https://docs.gluster.org/en/latest/release-notes/10.2/
https://docs.gluster.org/en/latest/release-notes/10.3/
We could install it with the following command
|
> apt install
glusterfs-server |
But, that is going to get us GlusterFS version 10.1.
OK after a bit of poking I found out how to do this.
Head over to
OK found the repo
https://launchpad.net/~gluster/+archive/ubuntu/glusterfs-10 [6]

OK run the following commands to trust this and get it updated
|
> sudo
add-apt-repository ppa:gluster/glusterfs-10 |
Now update
|
> sudo apt update |
Check version
|
> apt show
glusterfs-server |

10.3 I will take that!
Now install glusterfs
|
> sudo apt install
glusterfs-server |

Start GlusterFS up
After Installing GlusterFS on my 3 Ubuntu 22.04 boxes I am going to start the GlusterFS service on each of them, enable it to restart on a reboot then reboot all 3 boxes.
|
> sudo systemctl start
glusterd |
Check its status
|
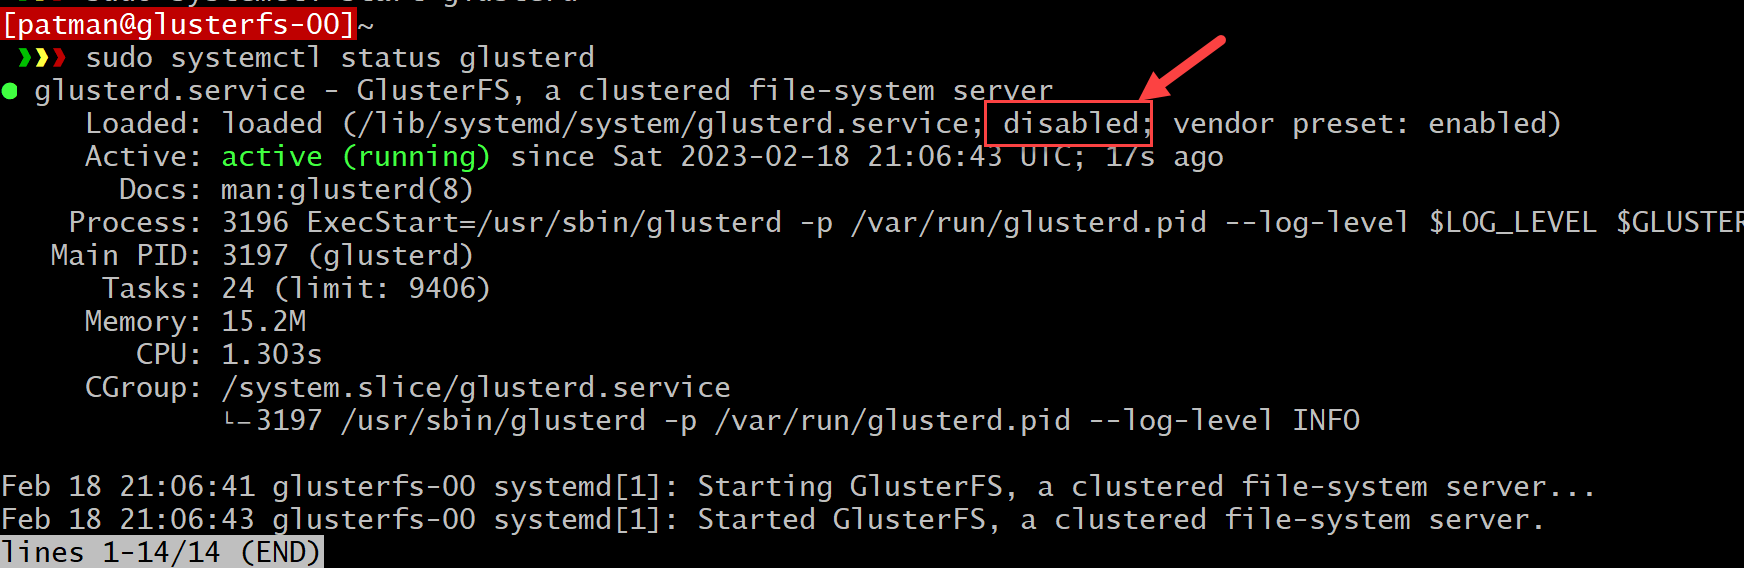
> sudo systemctl status
glusterd |
Now enable it so it starts after a reboot (You will notice in the above image it is currently disabled)
|
> sudo systemctl enable
glusterd |
Check the status
|
> sudo systemctl status
glusterd |

It is enabled, now reboot
|
> sudo reboot |
Check if its running after a reboot
|
> sudo systemctl status
glusterd |

Now Configure
I have glusterFS running on my 3 servers, their IPs are at…
·
192.168.0.200
192.168.0.201
192.168.0.202
At this point none of the servers are aware of each other. We need to add them all in the same Trusted Storage Pool (TSP).
The servers must allow each other to access each other on
port 24007.
I am not going to cover firewall issues here.
Trusted Storage Pool
I am going to think of 192.168.0.200 as my primary gluster node so I am going to run the following command to add the other two to the Trusted Storage Pool.
|
> sudo gluster peer
probe 192.168.0.201 |

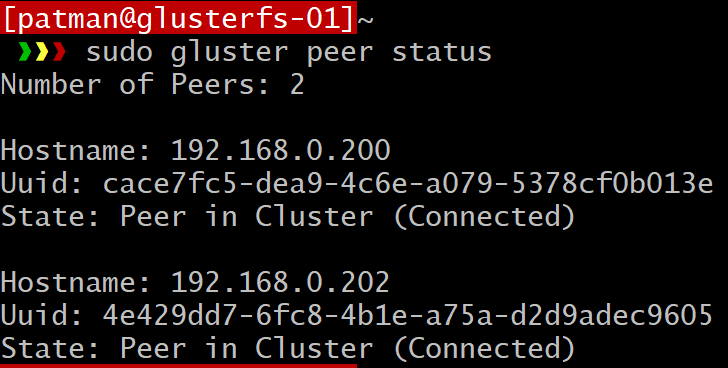
Now let’s verify
|
> sudo gluster peer
status |

Now run that same command on the other 2 servers

Now let’s check current connections
|
> sudo gluster pool
list |

We can see al the servers and they are currently connected 😊
I guess the last
command was giving its connection but this one is consolidated.
Setting Up A Volume
Check
out https://docs.gluster.org/en/v3/Administrator%20Guide/Setting%20Up%20Volumes/ [7]
A
volume is a logical collection of bricks where each brick is an export
directory on a server in the trusted storage pool.
There
are different ways to set up a volume.
In my case I want safety. I want
to have a set up where one server/drive can fail and I still have all my data. So I am going to setup a volume with a
replication of 1.
|
> sudo gluster volume
create replicated-volume replica
2 192.168.0.200:/data/brick1 192.168.0.201:/data/brick1 192.168.0.202:/data/brick1 |

It
Failed !!! Why?
|
> ls -alh /data/brick1 |

It did create a bricks1 folder and put a .glusterfs file in it on each of my 3 servers… but why the failure?
Let me try and make a volume with no replication on a single server.
|
> sudo gluster volume
create single-volume 192.168.0.200:/data/brick2 |

Hmm
that worked…
Let
me try the same thing with all 3 servers.
|
> sudo gluster volume
create triple-volume 192.168.0.200:/data/brick3
192.168.0.201:/data/brick3 192.168.0.202:/data/brick3 |

OK
that worked…
Let
me try and make a replication set to 3 (which is preferred)
|
> sudo gluster volume
create triple-replicated-volume replica 3 192.168.0.200:/data/brick4 192.168.0.201:/data/brick4
192.168.0.202:/data/brick4 |

Ok that worked…
So it
is having an issue with the replica set to 2.
Maybe
if we force it?
|
> sudo gluster volume
create forced-replicated-volume replica 2 192.168.0.200:/data/brick5 192.168.0.201:/data/brick5
192.168.0.202:/data/brick5 force |

Still
failed…
Maybe
if I try it on 2 glusterfs servers instead of 3?
|
> sudo gluster volume
create forced-duo-replicated-volume replica 2 transport tcp 192.168.0.200 :/data/brick6 192.168.0.201:/data/brick6 force |

That
worked!
…
Rethinking this…
OK I just want to get this up and running so I am going to create 2 volumes one with a republication of 2 using 2 nodes and one with a replica of 3 with 3 nodes.
So let me first delete the volumes I made in testing.
Let me see what I have
|
> sudo gluster volume list |

More detailed
info
|
> sudo gluster volume
info |

Now I need to delete them..
|
> sudo gluster volume delete
forced-duo-replicated-volume |

OK let me delete every volume then the bricks themselves.
Need to run this on each machine
|
> sudo gluster volume delete
forced-duo-replicated-volume |
Now
we are back to ground zero
Let me create the 2 volumes
|
> sudo gluster volume
create volume-one
replica 2 transport tcp 192.168.0.200:/data/brick1 192.168.0.201:/data/brick1 |
|
> sudo gluster volume
create volume-two
replica 3 transport tcp 192.168.0.200:/data/brick2 192.168.0.201:/data/brick2 192.168.0.202:/data/brick2 |
Now get all the details
|
> sudo gluster volume
info |
|
Volume Name: volume-one Status: Created Volume Name: volume-two Status: Created |
Now let’s start both volumes up
|
> sudo gluster volume start
volume-one |

Now check them
|
> sudo gluster volume
info |
|
Volume Name: volume-one Status: Started Volume Name: volume-two Status: Started |
We can see that the status is now created
Now let’s mount both drives. I will use my first server to mount them to.
Let me make some mount points
|
> sudo mkdir
/volume-one |

Now mount them using glusterfs
|
> sudo mount -t
glusterfs volume-one:192.168.0.200 /volume-one |
Mounting glusterfs on /volume-one failed.

Oops that one is my fault I revered the server and the mount info
|
> sudo mount -t
glusterfs 192.168.0.200:volume-one
/volume-one |

Success
And
we can see that volume-one is 14TB and volume 2 is 2 TB which makes some sense…
Volume-one is set up with replication 2 and has 2 gluster
Let me make 10 random files of 1MB in size on each volume
|
> cd /volume-one/ |
Same for the second volume
|
> cd /volume-two/ |

Now I have 20 unique files
Let me look at what is on my bricks
|
> sudo tree /data/ |
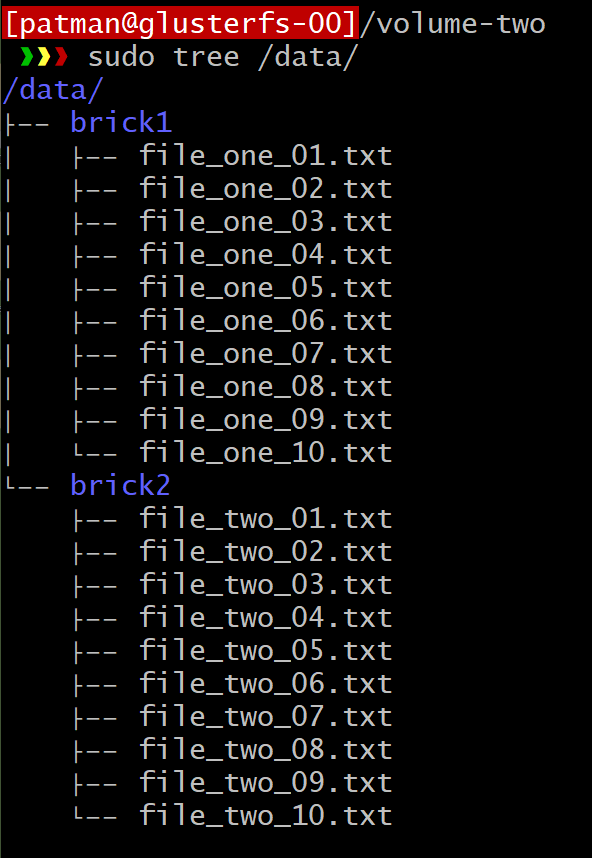
Now if I run this command on my second server I should get a
similar result.
But if I run it on my last server I should only see things in data brick 2

A quick md5sum check
|
> md5sum
/volume-one/file_one_01.txt; md5sum /data/brick1/file_one_01.txt |

Same identical file.
Client setup
I have another Ubuntu 22.04 server that I just want to be a client on. I just want to mount the drive and not have be part of a Gluster Storage Pool.
Run the following commands
|
> sudo
add-apt-repository ppa:gluster/glusterfs-10 |
Now create a folder and mount it.
|
> sudo mkdir
/volume-one-client |

There we go
Of course I have permissions issues only root can write to
it at the moment.
So lets tweak /etc/fstab to automount it on a reboot
|
> sudo vi /etc/fstab |
And place the following in it
|
192.168.0.200:/volume-one /volume-one-client glusterfs
defaults,_netdev 0 0 |
![]()
Test mounting before a reboot
|
> sudo mount
/volume-one-client/ |

OK let’s reboot and see what we have.
|
> sudo reboot |

Looks good
References
[1] GlusterFS main site
https://www.gluster.org/
Accessed 01/2023
[2] GlusterFS Quick Start Guide
https://docs.gluster.org/en/latest/Quick-Start-Guide/Quickstart/Accessed 01/2023
[3] Formatting Disks over 2 TiB
with parted
http://www.whiteboardcoder.com/2019/02/formatting-disks-over-2-tib-with-parted.html
Accessed 01/2023
[4] How to partition 22TB disk?
https://unix.stackexchange.com/questions/29078/how-to-partition-22tb-disk
Accessed 01/2023
[5] Gluster FS release Schedule
https://www.gluster.org/release-schedule/
Accessed 02/2023
[6] Gluster launchpad
https://launchpad.net/~gluster/+archive/ubuntu/glusterfs-10
Accessed 02/2023
[7] Setting up GlusterFS Volumes
https://docs.gluster.org/en/v3/Administrator%20Guide/Setting%20Up%20Volumes/
Accessed 02/2023
No comments:
Post a Comment